
Did you know over 1.2 billion people worldwide use Microsoft Word regularly, yet many only scratch the surface of its capabilities? Are you one of them? If you’ve ever wondered how to make your Word documents more visually appealing, professional, and efficient, the Insert and Layout toolbars are your golden ticket. This guide will help you explore these features in depth and empower you to create documents that truly stand out.
Why Are Toolbars So Important?
Before we jump into the specifics, let’s answer an important question: Why do you need to master these toolbars?
The Insert and Layout toolbars are like the brain and backbone of Microsoft Word. They offer the ability to customize, enhance, and transform your plain text into engaging, visually appealing documents. Whether you’re drafting a simple letter, creating a business proposal, or designing a brochure, understanding these toolbars can save time and significantly improve your work’s quality.
What Is the Insert Toolbar?
El Insert Toolbar is where you go to add interactive and multimedia elements to your document. It allows you to go beyond words and include visual aids, organizational tools, and interactive links.
Key Features of the Insert Toolbar
Here are some of the most commonly used features:
- Tables: Organize data into neat rows and columns for clarity.
- Images: Add visual appeal by inserting pictures from your computer or online sources.
- Shapes: Use various geometric shapes to create diagrams or highlight information.
- Gráficos: Represent data visually with bar graphs, pie charts, and more.
- Hyperlinks: Links to external websites or other sections within your document.
- Arte inteligente: Create visually engaging infographics to explain processes or hierarchies.
- Headers and Footers: Add consistent information like page numbers or document titles across your pages.
How to Use the Insert Toolbar
Let’s look at some practical ways to use the Insert toolbar:
Adding Visuals to Your Document
- Inserting Pictures:
- Ir a Insertar > Pictures.
- Select an image from your device or browse online images.
2. Adding Shapes:
- Click on Shapes in the Insert menu.
- Drag your chosen shape into your document and customize its size or color.
Inserting Tables
Tables are an excellent way to present structured data:
- Ir a Insertar > Table.
- Drag your mouse over the grid to select the number of rows and columns.
- Use the Table Design Tab to style your table with colors, borders, and shading.
Creating SmartArt
SmartArt is a lesser-known feature that makes complex data easy to understand:
- Navegar a Insertar > Arte inteligente.
- Choose from categories like Processes, Hierarchies, o Cycles.
- Input your data into the graphic template.
What Is the Layout Toolbar?
El Layout Toolbar is all about controlling the structure and arrangement of your document. It determines how your content appears on the page, allowing for precise customization.
Key Features of the Layout Toolbar
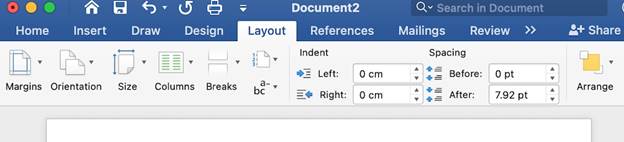
El Layout Toolbar is packed with formatting tools:
- Margins: Adjust the white space around your content.
- Orientation: Choose between portrait (vertical) and landscape (horizontal) layouts.
- Columns: Split your text into multiple columns for a magazine-style effect.
- Spacing: Control the space between lines, paragraphs, and sections.
- Page Size: Select from standard page sizes or define your custom dimensions.
- Section Breaks: Divide your document into sections to apply different formatting.
Practical Tips for Using the Layout Toolbar
Customizing Margins
Margins are essential for achieving a clean, professional layout:
- Navegar a Layout > Margins.
- Choose a predefined margin size (e.g., Narrow, Moderate).
- For advanced control, click Custom Margins.
Changing Document Orientation
Sometimes, a horizontal layout is better suited for your content:
- Ir a Layout > Orientation.
- Switch between Portrait o Landscape mode depending on your needs.
Managing Columns
Columns are perfect for newsletters, brochures, and articles:
- Select the text you want to split.
- Ir a Layout>Columns.
- Pick from predefined column layouts or create custom ones.
Advanced Features in the Insert Toolbar
Agregar hipervínculos
Hyperlinks connect your document to external resources or internal sections:
- Highlight the text or image you want to hyperlink.
- Right-click and select Link (or Hyperlink).
- Insert the URL or choose a location within the document.
Embedding Charts
Charts are essential for presenting numerical data:
- Ir a Insertar > Chart.
- Select the type of chart (e.g., Pie, Bar, Line).
- Input your data into the Excel spreadsheet that appears.
Advanced Features in the Layout Toolbar
Line Spacing for Readability
Line spacing impacts how easy your document is to read:
- Ir a Layout > Spacing.
- Adjust Before o After spacing for paragraphs.
Section Breaks for Flexibility
Section breaks allow for varied formatting within the same document:
- Hacer clic Layout > Breaks.
- Choose options like Next Page o Continuous.
Insert vs. Layout Toolbar: Key Differences
Understanding when to use the Insert and Layout toolbars is critical:
- Utilice el Insert Toolbar to add content like text boxes, images, charts, and links.
- Utilice el Layout Toolbar to adjust the overall structure, like margins, orientation, and spacing.
Tips to Maximize Productivity
To make the most of these toolbars, follow these tips:
- Learn Shortcuts: Familiarize yourself with shortcuts like Ctrl + C for copying and Ctrl + T for adjusting indents.
- Use Templates: Microsoft Word offers pre-designed templates to save time and effort.
- Experiment: Don’t be afraid to explore lesser-known features like SmartArt or section breaks.
Common Mistakes to Avoid
Even advanced users make mistakes. Here’s what to watch out for:
- Overloading Your Document: Adding too many elements can make your document cluttered.
- Ignoring Margins: Poor margin settings can make your work look unprofessional.
- Neglecting Readability: Always use proper line spacing and font sizes.
How the Toolbar Test Works in Microsoft Word 2021
The toolbar test for Microsoft Word 2021 evaluates your ability to utilize the Insert and Layout toolbars efficiently. Word 2021 introduces improved features, such as 3D model integration, icon insertion, and seamless tools for embedding online videos, offering users greater flexibility and creativity. Additionally, the Layout Toolbar provides advanced control over page alignment, spacing, and multi-section formatting, making document customization precise and straightforward. This test assesses how proficiently users can apply these features to create professional and visually engaging documents.
Ready to upgrade your Word experience? Purchase Microsoft Word 2021 now and unlock its full potential!
Conclusión
Microsoft Word is not just a word processor—it’s a powerful design and formatting tool. By mastering the Insert and Layout toolbars, you can elevate your documents to a whole new level of professionalism and creativity. Start exploring today, and transform the way you work with Word!


 No products in the cart.