Adding a table of contents (TOC) to long Word documents makes them easier to navigate and more user-friendly. A TOC shows readers each section and heading within a document and the page number it starts on. With just a few clicks, you can automatically generate a TOC in Word. In this tutorial, I’ll walk through the simple process.
Introduction
A table of contents is a list near the beginning of a long document that outlines each section, chapter, or heading included within. It also provides the page numbers where those headings appear.
Benefits of adding a TOC:
- Allows readers to quickly find information
- Organizes the content in a clear way
- Provides an overview of the document structure
- Looks professional and polished
The key steps to building a TOC in Word are:
- Applying heading styles
- Inserting the TOC
- Customizing appearance
- Updating when document changes
- Adding custom entries
Follow the instructions below to easily create a table of contents for your own long Word documents.

Step 1: Apply Heading Styles
For Word to recognize headings to include in the TOC, you first need to style them properly. Highlight the section title text and apply built-in Word heading styles like Heading 1, Heading 2, etc.
On the Home tab, find these in the Styles gallery. Click to apply the desired level style to each of your section headings.
Step 2: Insert Table of Contents
With headings styled, place your cursor where you want the TOC to go. Typically near the start of the document.
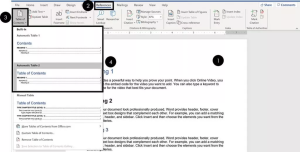
On the References tab, click Table of Contents and select one of the automatic table options. The TOC will insert listing your headings and their page numbers.
Step 3: Customize Table of Contents Appearance
If you want to modify the look of your TOC, open the Table of Contents settings to customize. Adjust indentation, tab leader settings, fonts, and more.
You can also right click the TOC and choose Edit Field to open formatting options to update style choices.
Step 4: Update Table of Contents When Document Changes
As you further edit and expand your document, update your TOC so it accurately reflects changes. Right click the TOC and choose Update Field.
This will refresh the entire table to include all headings and correct page numbers.
-300x125.png)
Step 5: Add a Custom TOC Entry
If you want to manually include an item in the TOC that’s not a heading, insert a TC field. Click in the TOC where you want to add the entry.
Type the text and page number for your custom entry. It will now appear in the generated table of contents.
Adding a TOC takes your long Word documents from tedious to navigable! Use these simple steps to create an organized, professional TOC.
点-300x175.png)


