Introduction
What are printable labels?
Printable labels are sheets of adhesive-backed paper or other materials designed to be printed with text, graphics, barcodes, or other information using a standard printer. These labels can then be peeled off and applied to various surfaces, such as products, packages, storage containers, or any item that requires labeling.
Benefits of using printable labels
Using printable labels offers several advantages, including:
- Customization: You can design and print labels tailored to your specific needs, incorporating your branding, logos, and unique information.
- Cost-effectiveness: Printing labels at home or in the office can be more cost-effective than purchasing pre-printed labels, especially for small quantities.
- Versatility: Printable labels come in various sizes, shapes, and materials, making them suitable for a wide range of applications.
- Professional appearance: Well-designed and printed labels can enhance the professional look of your products, packages, or organization.
Overview of the tutorial
This tutorial will guide you through the process of planning, designing, printing, and applying printable labels. We’ll cover everything from choosing the right label materials and size to designing your labels using various software options, printing techniques, and application tips.
Planning Your Labels
Determining the purpose and use of labels
Product labels
Product labels are typically used to display information about a specific item, such as the name, brand, ingredients, instructions, or other essential details. These labels are often found on food and beverage containers, cosmetics, and consumer goods.
Shipping labels
Shipping labels are essential for any business or individual involved in shipping and logistics. They provide crucial information like the sender’s and recipient’s addresses, tracking numbers, and any necessary handling instructions.
Organization and storage labels
Organization and storage labels are used to identify and categorize items in a home, office, or warehouse setting. They can be applied to boxes, file folders, shelves, or any storage container to help you quickly locate and access what you need.
Event and identification labels
Event and identification labels are commonly used for name tags, conference badges, or any occasion where attendees need to be identified. They can also be used to label personal belongings, such as luggage or equipment.
Choosing the right label materials
Paper labels
Paper labels are the most common and affordable option. They come in various finishes, such as matte, glossy, or semi-gloss, and are suitable for general labeling purposes. However, they may not be as durable or water-resistant as other materials.
Vinyl labels
Vinyl labels are more durable and water-resistant than paper labels, making them ideal for outdoor or industrial applications. They are also resistant to fading, smudging, and tearing, making them a popular choice for product labels or asset labeling.
Specialty labels (waterproof, metallic, etc.)
Specialty labels are designed for specific applications or environments. For example, waterproof labels are suitable for use in damp or wet conditions, while metallic labels can provide a premium, high-end look for product labeling. Other specialty labels include clear labels, fluorescent labels, and dissolvable labels.
Selecting the appropriate label size and shape
Labels come in various sizes and shapes, from small circular labels to large rectangular or square labels. When selecting the appropriate size and shape, consider the following factors:
- Surface area: Choose a label size that fits comfortably on the item or surface you’re labeling without overcrowding or leaving too much blank space.
- Information density: If you need to include a lot of text or graphics, choose a larger label size to ensure legibility and clarity.
- Aesthetic appeal: Consider the overall look and feel you want to achieve. For example, circular labels may be more visually appealing for product branding, while rectangular labels are often used for shipping or organization purposes.
Designing Your Labels
Software options for label design
Word processors (Microsoft Word, Google Docs)
Many word processors, such as Microsoft Word and Google Docs, offer built-in label templates or tools for creating and printing labels. These options are generally suitable for basic label design and printing tasks.
To design labels in Word or Google Docs:
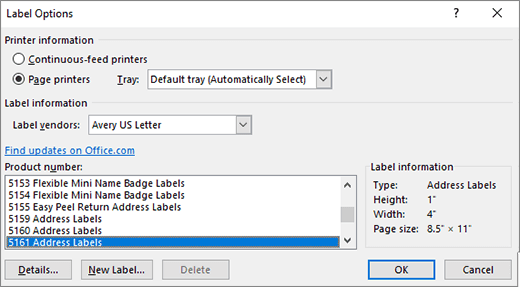
- Open a new document and navigate to the “Mailings” or “Tools” tab (Word) or the “Add-ons” menu (Google Docs).
- Look for the “Labels” or “Envelopes and Labels” option and select it.
- Choose the appropriate label size and brand from the available options.
- Enter your label text and make any necessary formatting changes.
- Preview and print your labels when ready.
Graphic design software (Adobe Illustrator, Canva)
For more advanced label design capabilities, graphic design software like Adobe Illustrator or online platforms like Canva can be excellent choices. These tools offer greater flexibility in terms of layout, typography, and graphics manipulation.
To design labels in Adobe Illustrator:
- Create a new document and set up the artboard size to match your desired label dimensions.
- Use the various drawing and text tools to create your label design, incorporating graphics, logos, and text elements.
- Utilize Illustrator’s powerful formatting and alignment tools to refine your design.
- When ready, export your design as a print-ready file (e.g., PDF, EPS) for printing.
Canva offers a user-friendly interface and a wide range of pre-designed templates specifically for labels:
- Sign up or log in to Canva and search for “label” templates.
- Choose a template that suits your needs and customize it with your own text, images, and branding elements.
- Adjust the layout, fonts, and colors as desired.
- Download your label design in a print-ready format (e.g., PDF, PNG) for printing.
Online label design tools
Several online tools are specifically designed for creating and printing labels, offering a streamlined and user-friendly experience. Examples include Avery Design & Print, OnlineLabels.com, and LabelFactory.com.
To use online label design tools:
- Visit the website and select the appropriate label size and material.
- Use the provided design interface to add text, graphics, and other elements to your label.
- Preview your design and make any necessary adjustments.
- Print your labels directly from the website or download a print-ready file for printing elsewhere.
Layout and design considerations
Text formatting (font, size, color)
When designing your labels, pay close attention to text formatting to ensure legibility and visual appeal. Choose easy-to-read fonts and adjust the size based on the label dimensions and the amount of text. Color choices can also impact readability, so consider using high-contrast combinations or follow branding guidelines.
Adding graphics or logos
Incorporating graphics or logos can enhance the visual appeal of your labels and reinforce brand recognition. However, be mindful of maintaining a balanced design and ensuring that the graphics don’t overshadow or obscure important text information.
Barcodes and QR codes
If your labels require barcodes or QR codes for tracking or information-sharing purposes, make sure to include them prominently and ensure they are properly generated and sized for optimal scanning and readability.
Alignment and spacing
Proper alignment and spacing can significantly impact the overall appearance and professionalism of your labels. Use grids, guides, or alignment tools to ensure consistent spacing between text and graphic elements, and maintain a balanced layout.
Creating a template or using pre-designed templates
To streamline the label design process and maintain consistency across multiple label batches, consider creating a custom template or using pre-designed templates from your software or online resources.
Creating a custom template:
- Design your label layout, including text formatting, graphics, and any other elements you want to reuse.
- Save the design as a template file (e.g., Word template, Illustrator file, Canva template).
- When creating new labels, open the template and make any necessary modifications or content updates.
Using pre-designed templates:
- Browse the available templates in your software or online platform.
- Choose a template that aligns with your design preferences and requirements.
- Customize the template by replacing placeholder text and graphics with your own content.
Printing Your Labels
Setting up your printer
Printer settings (paper size, orientation, print quality)
Before printing your labels, it’s essential to ensure your printer is set up correctly. Check the following settings:
- Paper size: Select the appropriate paper size for your label sheets.
- Orientation: Choose portrait or landscape orientation based on your label design.
- Print quality: Adjust the print quality settings (e.g., draft, normal, best) based on your desired output quality.
Installing printer drivers (if needed)
If you’re using a new printer or encountering issues with your existing printer, you may need to install or update the printer drivers. Follow the manufacturer’s instructions or visit their website to download and install the latest drivers for your printer model.
Loading label sheets correctly
Proper loading of label sheets is crucial to ensure accurate printing and prevent paper jams or misalignments. Follow these steps:
- Refer to your printer’s manual or on-screen instructions for loading label sheets.
- Fan the label sheets before loading to prevent them from sticking together.
- Load the label sheets with the printable side facing the correct direction (typically face-up or face-down, depending on your printer model).
- Adjust the paper guides to fit the label sheet size snugly without bending or creasing the sheets.
Printing techniques
Printing directly from your software
Most label design software and word processors allow you to print your labels directly from the application. Follow these general steps:
- Open your label design file or document.
- Go to the “File” menu and select “Print” or click the print icon.
- In the print settings dialog box, ensure the correct printer, paper size, and orientation are selected.
- Choose any additional printing options, such as print quality or number of copies.
- Click “Print” to send your labels to the printer.
Using online printing services
If you don’t have access to a suitable printer or prefer a professional printing service, you can upload your label designs to online printing companies like VistaPrint, PrintRunner, or PsPrint. These services often offer a wide range of label materials, sizes, and finishing options, as well as bulk printing discounts.
Printing on demand (for small batches)
For small batches or one-off label printing needs, consider using print-on-demand services like Office Depot, FedEx Office, or your local print shop. These services allow you to print a limited quantity of labels without committing to a larger print run.
Troubleshooting common printing issues
Misaligned labels
If your labels are printing misaligned or off-center, try the following troubleshooting steps:
- Check that the label sheets are loaded correctly in the printer tray.
- Adjust the printer settings to match the specific label size and brand you’re using.
- Clean the printer rollers and paper path to remove any debris that could cause misfeeds.
- If the issue persists, try updating your printer drivers or contacting the manufacturer for further assistance.
Smudging or fading
Smudging or fading can occur due to various factors, such as low-quality ink or toner, improper label material, or excessive moisture or heat exposure. To address these issues:
- Use high-quality ink or toner cartridges designed for your printer model.
- Choose label materials suitable for your printing needs (e.g., water-resistant vinyl for outdoor labels).
- Store label sheets in a cool, dry place before printing.
- Adjust your printer settings to increase print quality or apply protective coatings.
Paper jams
Paper jams can be frustrating and can potentially damage your printer. If you experience frequent paper jams when printing labels:
- Make sure the label sheets are loaded correctly and not bent or damaged.
- Check for any obstructions or debris in the printer’s paper path and clean it if necessary.
- Adjust the paper guides to fit the label sheet size properly.
- If the issue persists, consult your printer’s manual or contact the manufacturer for further assistance.
Applying and Using Labels
Preparing surfaces for label application
Cleaning and degreasing
For optimal adhesion, it’s essential to clean and degrease the surface where you’ll be applying the labels. Use a suitable cleaner or degreaser to remove any dirt, oil, or residue that could prevent the label from sticking properly.
Ensuring proper adhesion
Different surfaces may require specific preparation methods to ensure proper label adhesion. For example, porous surfaces like wood or concrete may need to be primed or sealed before applying labels. Consult the label manufacturer’s recommendations or seek professional advice for specialized applications.
Applying labels correctly
Peeling and positioning
When applying labels, start by carefully peeling off the backing or liner from the label. Avoid touching the adhesive side to prevent contamination or loss of stickiness.
Position the label correctly on the surface, ensuring proper alignment and orientation. For best results, apply labels at room temperature and on a flat, smooth surface.
Smoothing and removing air bubbles
Once the label is in place, use a plastic squeegee or your fingers to smooth it out, starting from the center and working outwards. This process helps remove any air bubbles or wrinkles and ensures maximum adhesion.
Caring for applied labels
Protecting from moisture, heat, and abrasion
Depending on the label material and the intended application, you may need to take additional steps to protect your applied labels from moisture, heat, or abrasion. For example:
- Waterproof labels may require a clear, protective overlaminate for outdoor or humid environments.
- Labels on products exposed to heat or sunlight may benefit from UV-resistant coatings or lamination.
- Abrasion-resistant labels or clear protective covers may be necessary for labels subjected to frequent handling or rough conditions.
Removing labels (if needed)
In some cases, you may need to remove labels from surfaces or objects. The removal process can vary depending on the label material and the surface it’s adhered to. Some general tips include:
- Use a label removal solvent or adhesive remover specifically designed for the label material.
- Apply heat (e.g., from a hairdryer or heat gun) to soften the adhesive for easier removal.
- Gently scrape or peel off the label, taking care not to damage the underlying surface.
- Clean the surface thoroughly after label removal to ensure no adhesive residue remains.
Advanced Techniques and Tips
Customizing labels with variable data printing
Variable data printing (VDP) allows you to create personalized or customized labels by merging data from a spreadsheet or database with your label design. This technique is useful for applications like mailing labels, product serialization, or personalized event badges.
Integrating labels with inventory management systems
For businesses and organizations with extensive labeling needs, integrating your label printing process with inventory management systems can streamline operations and improve efficiency. This integration allows you to automatically generate labels with up-to-date product information, barcodes, or tracking numbers.
Designing labels for specific industries (retail, healthcare, etc.)
Different industries may have specific requirements or regulations for label design and content. For example, retail labels may need to include pricing and product information, while healthcare labels may require specific symbology or compliance with regulatory standards. Research and follow the relevant guidelines for your industry.
Label design best practices and guidelines
To ensure your labels are effective, easy to read, and visually appealing, consider the following best practices and guidelines:
- Use clear, legible fonts and contrast colors for optimal readability.
- Keep text concise and focused on essential information.
- Incorporate appropriate barcodes, QR codes, or other machine-readable elements as needed.
- Follow branding guidelines and maintain consistent design elements across your labels.
- Test your labels for durability, adhesion, and longevity in the intended application environment.
Resources and Further Learning
Recommended label design software and tools
Here are some recommended software and tools for label design:
- Microsoft Word (built-in label templates)
- Adobe Illustrator (advanced graphic design capabilities)
- Canva (user-friendly online design platform)
- Avery Design & Print (specialized label design software)
- com (online label design tool)
- com (online label design and printing service)
Online communities and forums for label enthusiasts
Connect with other label enthusiasts, ask questions, and share your designs and experiences in online communities and forums, such as:
- Avery Label Printing Community
- Labeling News (industry news and discussions)
- Reddit’s /r/labeling and /r/printing subreddits


