
Introduction
Margins are an essential aspect of document formatting, as they define the blank space around the content on a page. Proper margin settings not only enhance the readability and visual appeal of your documents but also ensure compliance with specific document standards or style guides.
In Microsoft Word, you have complete control over margin settings, allowing you to customize them according to your needs. This tutorial will guide you through understanding margin types, setting margins using various methods, applying advanced margin techniques, and adjusting margins for specific purposes.
Benefits of customizing margins in Word:
- Improves readability and aesthetics of your documents
- Ensures compliance with style guide requirements
- Accommodates specific printing or binding needs
- Optimizes layout for different document types (e.g., books, reports, digital publications)
Part 1: Understanding Margin Types
1.1. Top, Bottom, Left, and Right Margins
Before diving into margin customization, it’s important to understand the different types of margins and their purposes:
- Top Margin: This margin defines the blank space between the top edge of the page and the content.
- Bottom Margin: This margin determines the blank space between the bottom edge of the page and the content.
- Left Margin: This margin sets the blank space between the left edge of the page and the content.
- Right Margin: This margin controls the blank space between the right edge of the page and the content.
Standard margin sizes can vary depending on the document type. For example, academic papers often have 1-inch margins on all sides, while business documents may have narrower margins.
1.2. Header and Footer Margins
In addition to the main body text margins, Word also allows you to set separate margins for headers and footers:
- Header Margin: This margin defines the blank space between the top edge of the page and the header content.
- Footer Margin: This margin determines the blank space between the bottom edge of the page and the footer content.
Header and footer margins are typically smaller than the main body text margins, allowing for a balanced and visually appealing layout.
1.3. Gutter Margin (for Binding)
The gutter margin, also known as the binding margin, is an additional margin used for documents that will be bound, such as books or reports:
- Gutter Margin: This margin allows extra space for binding, ensuring that the content is not obscured or too close to the binding edge.
Gutter margins are typically wider than the regular left or right margins and are applied to the side of the document where the binding will occur.
Part 2: Setting Margins in Word
2.1. Using the Margin Ruler
One of the easiest ways to set margins in Word is by using the margin ruler:
- Locate the margin ruler at the top and left side of the document window.
- To adjust the left and right margins, click and drag the left or right margin marker on the horizontal ruler.
- To adjust the top and bottom margins, click and drag the top or bottom margin marker on the vertical ruler.
As you drag the margin markers, you’ll see the margin measurements update in real-time, allowing you to set precise margin values.
2.2. Utilizing the Page Setup Dialog
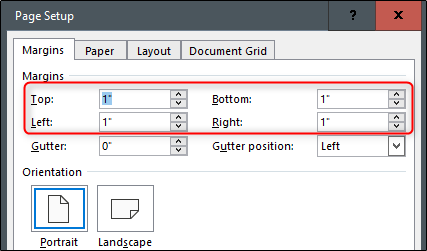
If you prefer to set margins using numerical values, you can use the Page Setup dialog:
- Go to the “Layout” tab and click on the “Margins” button in the “Page Setup” group.
- In the “Margins” dropdown menu, select “Custom Margins.”
- In the “Page Setup” dialog box, enter the desired margin values in the respective fields (Top, Bottom, Left, Right).
- You can apply the margin settings to the entire document or only to specific sections using the “Apply to” option.
- Click “OK” to apply the new margin settings.
2.3. Applying Preset Margin Options
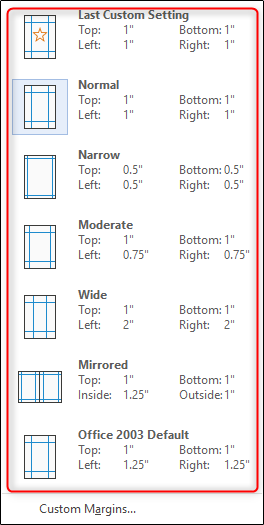
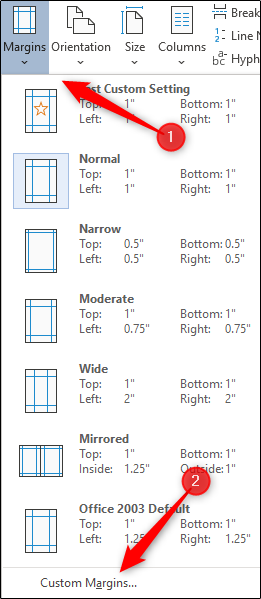
Word also offers several preset margin options for quick and easy margin adjustments:
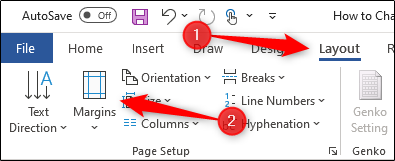
- Go to the “Layout” tab and click on the “Margins” button in the “Page Setup” group.
- Select one of the preset margin options from the dropdown menu, such as “Normal,” “Narrow,” or “Wide.”
- The selected margin settings will be applied to your document immediately.
Part 3: Advanced Margin Techniques
3.1. Creating Custom Margin Settings
While Word’s preset margin options are convenient, you may need to create custom margin settings for specific document requirements:
- Follow the steps for using the Page Setup dialog (as described in Part 2.2).
- In the “Page Setup” dialog box, enter the desired custom margin values.
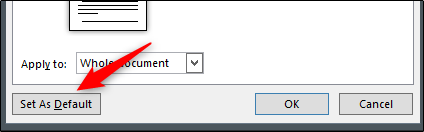
- Click the “Default” button to set the custom margins as the new default for future documents.
- Optionally, you can save the custom margin settings as a new preset by clicking the “Save” button and giving it a descriptive name.
3.2. Setting Different Margins for Sections
In some cases, you may need to apply different margin settings to specific sections of your document:
- Place the cursor where you want to start a new section with different margins.
- Go to the “Layout” tab and click on the “Breaks” button in the “Page Setup” group.
- Select the “Next Page” option to start a new section on the following page.
- Adjust the margins for the new section using any of the methods described earlier.
3.3. Mirroring Margins for Two-Sided Documents
If you’re creating a document that will be printed on both sides of the paper, such as a book or booklet, you may want to mirror the margins for proper binding:
- Go to the “Layout” tab and click on the “Margins” button in the “Page Setup” group.
- Select “Custom Margins” from the dropdown menu.
- In the “Page Setup” dialog box, check the “Mirror margins” option.
- Set the appropriate gutter margin value (the binding margin) in the respective field.
- Click “OK” to apply the mirrored margin settings.
Part 4: Adjusting Margins for Specific Purposes
4.1. Margins for Printing and Binding
When preparing a document for printing and binding, it’s essential to consider the appropriate margin settings:
Recommended margin settings for printing and binding: For standard printing, a minimum of 1-inch margins on all sides is recommended. However, for documents that will be bound, you’ll need to increase the gutter margin to accommodate the binding.
Adjusting gutter margins for binding: Follow the steps for mirroring margins (as described in Part 3.3) and set the gutter margin value based on the binding requirements, typically between 0.5 and 1 inch.
4.2. Margins for Online Publishing and Digital Documents
When creating documents for online publishing or digital distribution, different margin considerations apply:
Optimal margin settings for digital documents and ebooks: For digital documents and ebooks, narrower margins are generally preferred to optimize the reading experience on different screen sizes. A common recommendation is to set margins between 0.5 and 1 inch.
Considerations for responsive design and different screen sizes: If your document will be viewed on various devices with different screen sizes, consider using a responsive design approach by adjusting the margins dynamically based on the viewing device or window size.
4.3. Margins for Specific Document Types
Different document types often have specific margin requirements or guidelines:
Margin guidelines for academic papers, reports, and books: Academic papers and reports typically follow specific style guides, such as APA, MLA, or Chicago, which provide margin requirements. For books, industry standards or publisher guidelines may dictate the appropriate margin settings.
Adjusting margins to comply with style guide requirements: Refer to the relevant style guide or publisher guidelines and adjust your margins accordingly. This ensures that your document adheres to the prescribed formatting standards.
Tips and Tricks
Best practices for setting margins in Word: Always double-check your margin settings before finalizing your document. Ensure consistency throughout the document, and adjust margins as needed for specific sections or purposes.
Useful Word features and shortcuts for margin management: Explore Word’s keyboard shortcuts for quickly adjusting margins, such as Alt+P+M (Page Setup dialog) or Ctrl+Shift+M (Mirror margins). Additionally, utilize the Navigation Pane to quickly navigate between sections with different margin settings.
Troubleshooting common margin-related issues: If you encounter issues like text overlapping with margins or margins resetting unexpectedly, try updating your Word version, checking for add-in conflicts, or searching for solutions in Word’s help documentation or online forums.
Conclusion
Mastering margin settings in Microsoft Word is essential for creating professional-looking documents that meet specific formatting requirements. By understanding margin types, utilizing various margin adjustment methods, applying advanced techniques, and tailoring margins for specific purposes, you can ensure that your documents have a polished and visually appealing layout.
Remember, proper margin settings not only enhance readability but also contribute to the overall aesthetic and compliance of your documents. Take the time to explore Word’s margin customization options and apply the techniques learned in this tutorial to elevate the presentation and formatting of your written works.


 No products in the cart.